This tutorial tells you about how our equipment stores the recordings that you make and how you transfer those files to your portable hard drive for use in this class. It also shows you how to import these files into Final Cut Pro X (FCPX).
The Basics of SD Cards
 |
| An SD Card identical to the ones we use in the BMPCC. (Image from B&H Photo) |
SD cards have been around since 1999 and have gotten much larger and more powerful over the years. Initially, a 512mb card was considered large but would be considered ludicrously small today. In September of 2014, Sandisk introduced an extremely fast 512GB card for just a little under $750! SD cards vary in storage capacity (measured in GB) and in read/write speed (measured in Megabytes per second or MB/s) The other less precise measure is "Class - Class 6, 10, etc." I have found measuring SD cards by their advertised class to be less useful. Pay attention to the write speed in particular when selecting an SD card - that is what matters the most.
Many DSLR cameras and camcorders will record video to slower cards, but only at their lower quality/lower frame rate settings - the higher quality options will not be available on the camera's menu. I had a student wonder why the video from his Canon 70D looked like crap. It was because he had a cheap, small, and especially, SLOW SD card in it that did not allow him to access the Canon's higher bitrate recording settings. Remember, size is not everything! A large capacity card that is slow will be just as useless as a small card. Go big (and fast) or go home.
The fastest cards the Studio has go in the Blackmagic Pocket Cinema Camera. This is because the data record rate at the BMPCC's highest quality setting is very high. Thus, we use the Sandisk Extreme Pro cards that record at 90 MB/s. The BMPCC kit is supplied with two of these cards. When recording in ProRes422HQ, they will hold 41 minutes of footage. They hold closer to an hour in regular ProRes422. In Compressed RAW, they hold only about 13 minutes. (We're not going to be using RAW workflows in this class.) These cards are fairly expensive. Be careful with them. These were the fastest SD cards you could buy a year ago. Not so anymore.
I have supplied the GH3 with the Sandisk Pro (not "extreme") cards at 45 MB/s. One 64GB card is capable of recording at the camera's highest quality for almost exactly two hours, which is very impressive and practical.
The Zoom audio recorders can get by with much slower cards and a comparatively small and slow card will record hours upon hours of multi-track audio.
Copying Your Data to the Hard Drive
The first thing you should do after filming an interview is copy the contents of your SD cards to your portable hard drive:
Since Final Cut Pro X (FCPX) is designed around using a fast external hard drive, I will issue each of you a 1TB (one TerraByte, or 1000GB) Thunderbolt based hard drive, the Buffalo MiniStation. The point of this is that it will allow you to carry your drive to any of the labs on campus that use FCPX to work on your project. The Studio has only ONE editing workstation of its own.
If you do not own a newer Mac that has the Thunderbolt port, the Buffalo drives are capable of also running off of a special USB cable. While USB is not a viable option when running FCPX - it is much too slow - you may need to use it to save the data from your SD card to the drive if you cannot immediately get to a computer with FCPX on it and need to return the equipment. The Buffalo drive can also be read by a PC, but I have not tried this to confirm. Yet I believe it is possible to even use a Windows based PC to copy your data to the Buffalo drive... I just haven't tested it.
While you can import your footage to the computer by plugging the camera into the computer's USB port with the appropriate cable, this is not the most efficient way of doing it. Most computers now (including all recent Macbooks and iMacs) have SD card readers built in. Thus, the first step to importing your footage is to pop out your SD card and put it into your computer's reader slot and plug in your Buffalo MiniStation Drive.
Copying your files if you don't have immediate access to FCPX:
When I do my work, I tend to import my files directly into Final Cut Pro from the SD Card. But if you aren't near a computer using Final Cut (which is a real possibility) and you want to save the data from the SD card before turning in your equipment, then you should do the following:
Plug the SD card in and copy the card's entire contents to a folder labeled "raw SD card data" or some other memorable name that you created ON YOUR THUNDERBOLT portable drive. This will enable you to import the data properly into FCPX later on.
BUT NOTE... IMPORTANT!!! If you just drag the SD card icon to your folder on the Buffalo Drive, it will only create an alias of the card, not copy the actual data. You will LOSE all your footage if you do this. The way to make sure that is to open the SD card and copy all the files/folders from the card to your Buffalo Drive.
One benefit of copying your files this way is that you will spend less time copying them when you are finally wanting to import them into FCPX because you will be pulling them into FCPX from your Thunderbolt-equipped Buffalo Drive, which is a lot faster than your SD card reader.
Another benefit of copying from your SD cards to a folder on your Buffalo drive is that if you do your importing into FCPX directly, you have to wait until FCPX is all done with a card (including transcoding) before it will allow you to eject it. FCPX is also sometimes wonky about letting you eject a card that you are clearly done using, saying "it is being used." This requires you to quit FCPX to eject the card and re-start the program to begin importing from another card.
How the files appear when stored on your cards:
Blackmagic Pocket Cinema Camera:
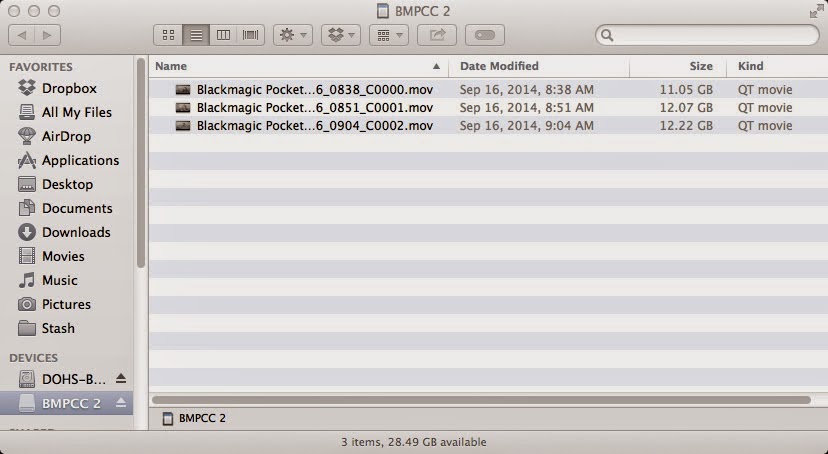 |
| The files on the BMPCC are located in the root directory of the SD card... and they are GIGANTIC! |
Panasonic GH3
The GH3 does things a bit differently than the BMPCC. The system it uses is better than most DSLR cameras that shoot HD video, but it isn't as seamless as the one large file generated by the Blackmagic. This has to do, it seems, with some sort of camcorder tax in Europe. In other words, there is no technological reason for it. What this means is that most DSLR cameras will only record about 30 minutes of video before you have to start and stop - meeting the maximum allowable file size before the Euro camcorder tax applies. This is not acceptable for a long form interview, and the Panasonic line of GH2/3/4 are the only cameras that I know of to date that have implemented the idea of the automatic chaining of files together in sequence. In other words, when the file gets too big, it automatically starts recording another file. Thus, in an interview like the one shown below, which ran a couple of hours, we see 14 files instead of 2, reflecting the number of times the camera was actually started and stopped. You will notice that all of the files are about the same size.
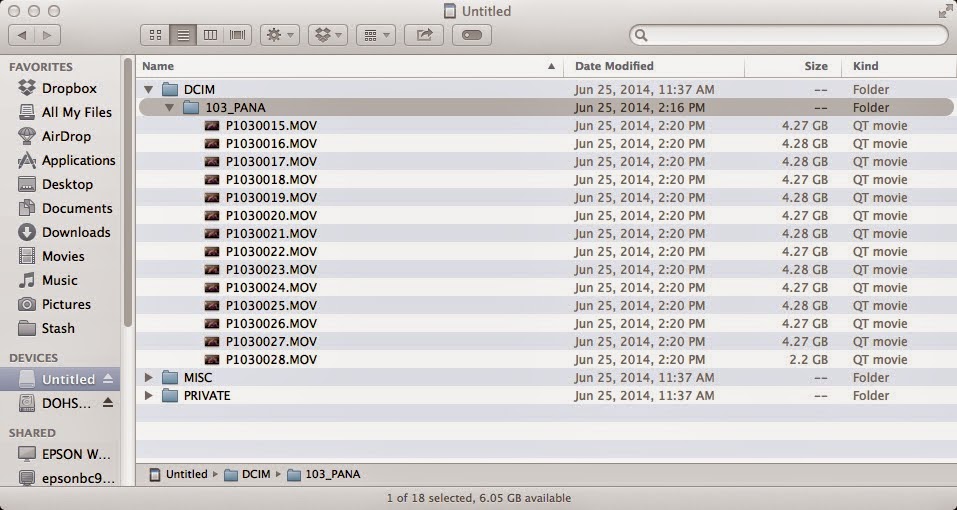 |
| The Panasonic GH3's file structure. |
You will find these files located in the DCIM folder in a "_PANA" subfolder. If you go to import these directly into Final Cut X, FCPX will automatically know where to find the files on the SD card.
Zoom H5/H6:
It is important to understand how the Zoom stores the audiorecordings you make. It is actually very simple but will drive you crazy if you aren't aware of how it all works. The Zoom H6 is capable of recording six independent tracks (Left, Right, 1, 2, 3, and 4). The Zoom H5 is capable of recording four independent tracks (Left, Right, 1, and 2.) Left and Right are recorded as a stereo pair in the same track. Since you aren't generally recording L and R (these tracks come off the Zoom's built-in microphone) you won't probably encounter these files. But if you do, they will be called ZOOM000x-St.WAV where "x" is the number of your recording. Each of the other tracks will be named ZOOM000x-Try.WAV where "x" is the recording number and "y" is the track number. See the image of the Zoom's folders below:
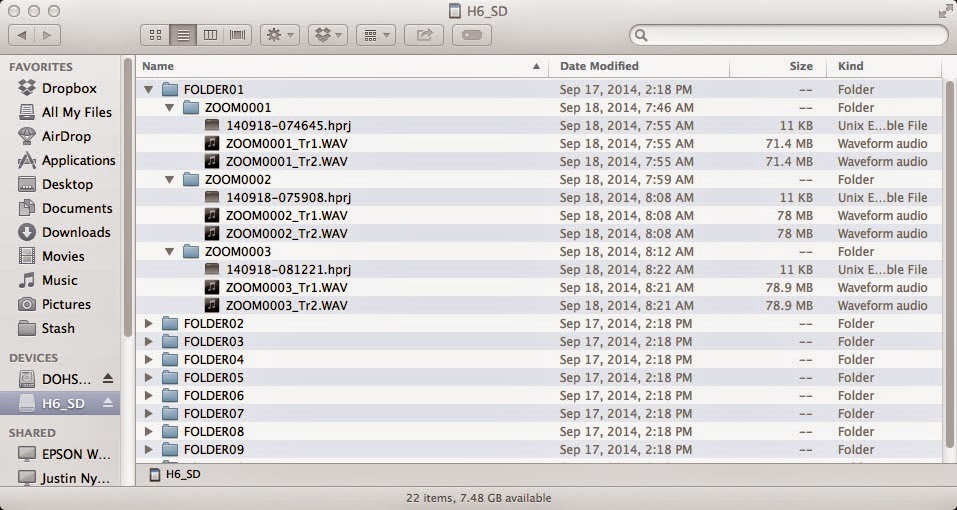 |
| The file structure from the Zoom H6 |
Importing your files into Final Cut Pro X
NOTE: If you are importing files from the BMPCC, you are probably going to want to color correct them first with FilmConvert. See this post on how to do that.
FCPX can be an intimidating program if you have never used any video editing or graphics oriented software before, but it is actually pretty easy to use. It is, however, important to follow directions to make sure your project turns out. There are a gazillion files that go into making an edited sequence - ones you see and a whole bunch more that you do not see - files that are used by the computer to manage its functions. It is important to not lose track of any of these files. Fortunately, FCPX does pretty much all of the file tracking for us. In fact, file management is one of the big advantages that Apple put into FCP in the "X" version over the previous version, "7." (Don't ask me where versions 8 and 9 went!) The latest update to the software changed a few things around in this regard a bit right before our semester began. After a bit of anxiety on my part, I now see that this system is even better for students new to the software and will probably help me manage your files more effectively in the long run.
The first thing you will probably ever do with FCPX is import your footage, and that's all we are going to concentrate on right now. We will deal with only the upper left hand corner of the screen right now. Don't be overwhelmed by all of the other windows. Forget about all that!!
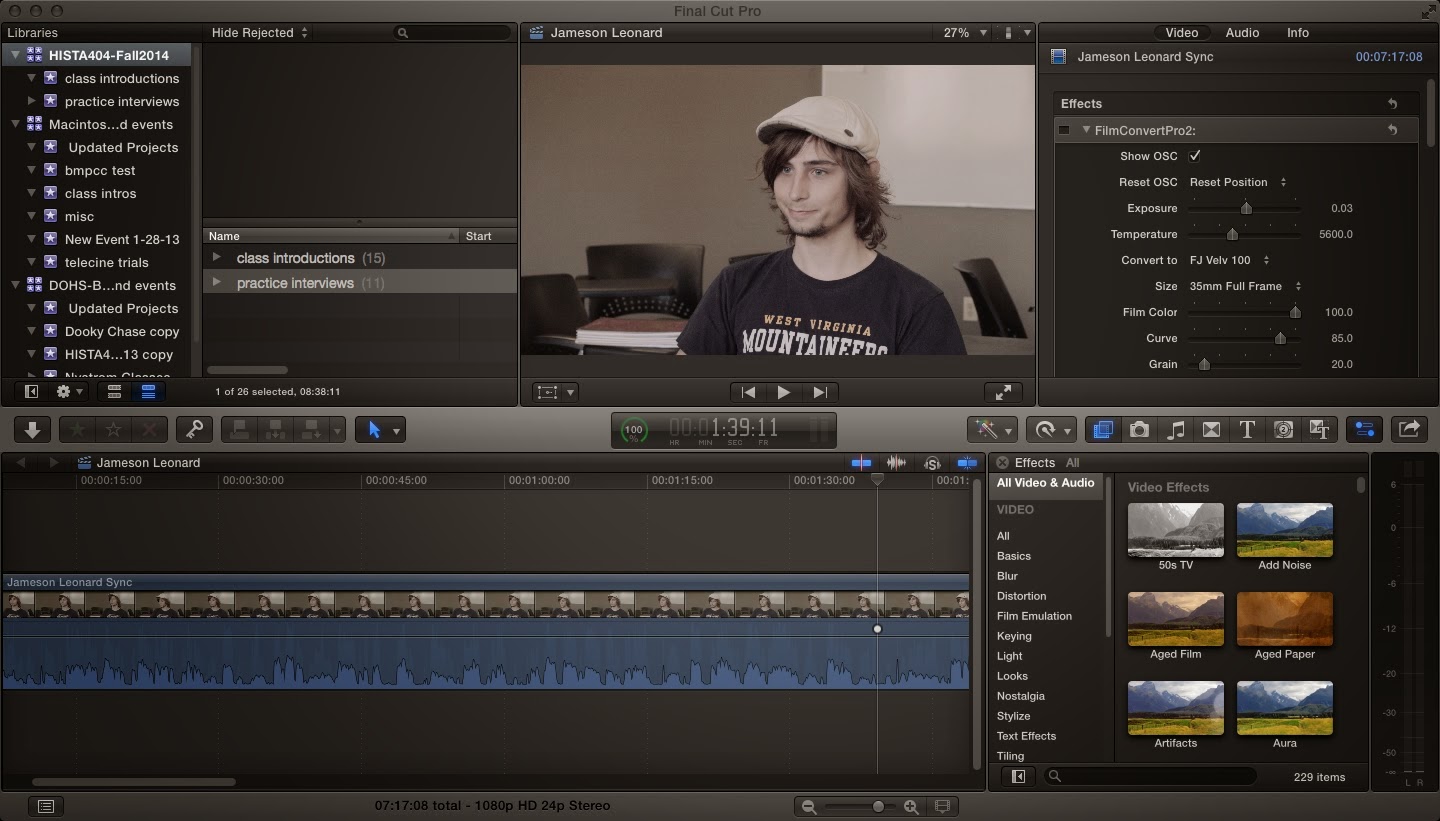 |
| There are a BUNCH of windows in the FCPX screen. Don't worry about that now. All we are going to concern ourselves with at this point is the upper left hand corner, the "Libraries" window. |
If you are importing files for the first time, or are starting a completely new project, go ahead and create a new library to contain everything that you are going to import by going to FILE -> NEW LIBRARY.
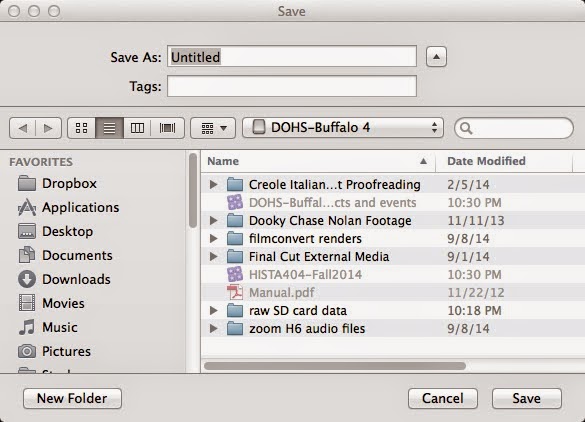 |
| When you hit FILE->NEW LIBRARY it will bring up this dialogue. BE SURE that your Buffalo Drive is the selected volume for your new library (here it is DOHS-Buffalo 4). You can name it whatever you want, but please be descriptive of the Library's content. |
Once you have created your library, you are ready to start importing footage into it from either your SD Card or from the folder on your Buffalo Drive where you saved the files from your SD cards. There are a number of ways to tell FCPX to import media, but the one that I like the best is to right-click on your library in the "Libraries" window in the upper left hand corner and it will pop up a menu that offers you a number of options including "Import Media... " or [⌘-I].
When you import media, you are creating an "EVENT." "Events" are where you store the files that you record as well as manipulated versions of those recordings. Libraries can contain many events. If you have used iMovie, events work very similarly. For instance, say you interview two different people, you could put them into two different events in the same library. Or perhaps you want to put all of your B-roll material in one event and your interviews in another. Think about ways that this can help you organize your material. "Projects" are edited sequences that reference the files in your events - something you will learn about later.
Importing Media:
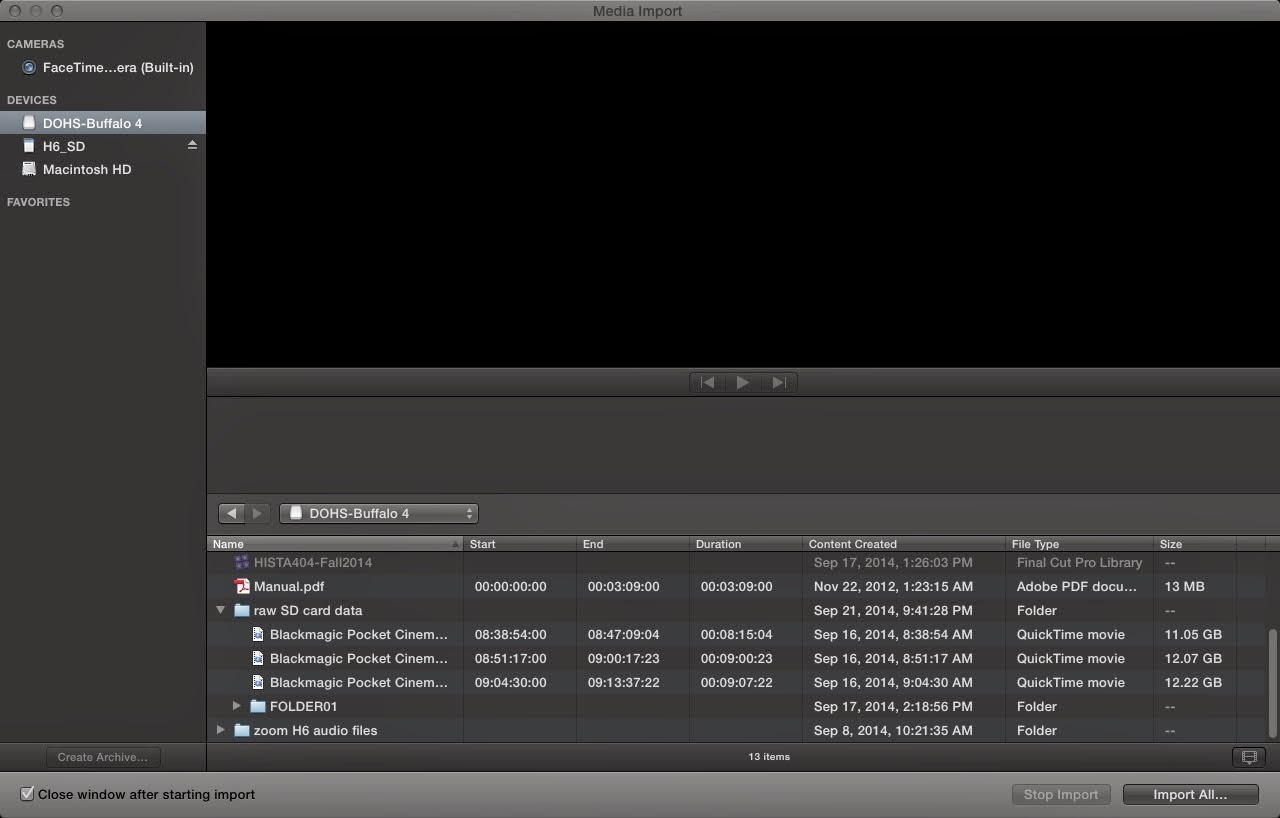 |
| Right-clicking to "Import Media..." or clicking on your library and hitting [COMMAND-I] will bring up the Media Import window |
When you have selected your media, you can hit "Import Selected." This will bring up a dialogue box:
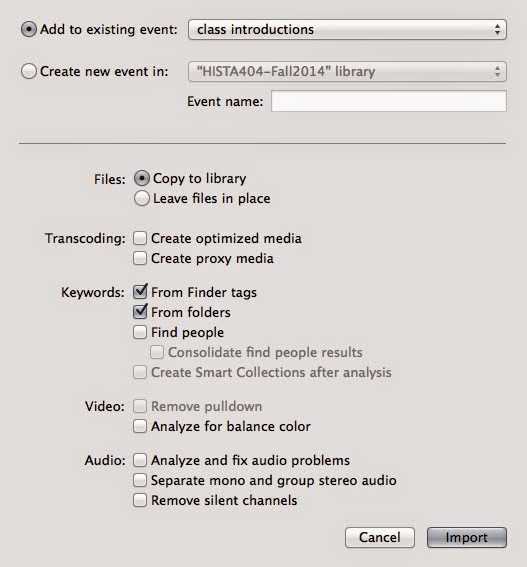 |
| The dialogue box for importing media into an event. |
Make sure the "Copy to library" button is selected! This will make copies of the files that you already have in your Buffalo Drive's folder and place them in the right spots in your Final Cut library. Technically speaking, this is wasteful of disk space, but to not do this is a REALLY BAD IDEA. Once the files have been copied to your FCPX library, you won't need the folder where you originally copied the files from your SD card.
Files normally need to be TRANSCODED. This means that the format in which your camera recorded your movies needs to be converted into the video file format (or "codec") used by FCPX, a variety of Quicktime called "ProRes." There are a bunch of different flavors of ProRes, including "lite," standard 422, HQ, 444, etc. These all have to do with the amount of image data stored in them. The files I imported here came from the BMPCC, which records natively in ProRes so they do not require any transcoding. Final Cut knows this automatically so the button is not checked. This is one of the nice things about the BMPCC camera. It takes a lot less time to import the files because no "transcoding" needs to take place. When you import from the GH3, however, the files need to be transcoded from the GH3's native format to the ProRes that FCPX needs. Note: ProRes is a type of Quicktime file. Quicktime is a container that uses the .MOV and .M4V extensions. Don't worry if you don't understand all of this right now.
Generally do not allow FCPX to fix any audio or video problems when it imports your files. If there are problems, we'll take care of that when we edit.
Something to think about with the Zoom: If your event already has ZOOM track files in it, and you are importing new ones recorded at another session, there is a good chance that you will create duplicate file names in your event. FCPX will not overwrite the existing files in your event, but you will have two different tracks with the same name in your event (FCPX will put a marker on the new files). You can rename any of the files in the event to help keep them straight, but you might just consider creating a new event entirely when you import from a different recording session.
NOTE ALSO, if you select the folder on the Zoom instead of just the .WAV files, FCPX will tell you that the instruction files are not supported. That's okay, you don't need them in FCPX. By just checking FOLDER01 in the import dialogue, it will import all of the tracks stored in all of the subfolders.
NO, YOU AREN'T DONE YET!!
It will appear that your files have imported into their event immediately after clicking on "Import." In fact, when you click on your event in the Libraries window, you will see your recordings displayed and can even play them. But this does not mean that FCPX is done copying the media to the proper location or transcoding it to ProRes. In the very center of the FCPX window you will see a little circle with a "%" in the bottom of it and a number in the center. This is your processing status indicator, and you will come to hate this little number and window with a passion. Click on it and it will bring up the following status window:
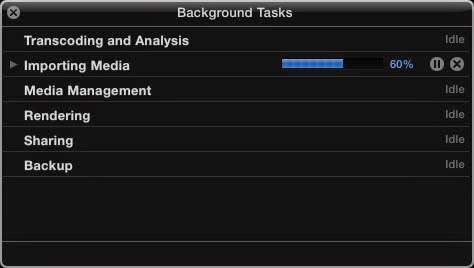 |
| Where your computer's processing power comes to bear. |
One frustrating thing that you will notice is that any time you use your computer in FCPX, most of these processes pause. If you are in a hurry, don't touch the computer, and don't let it fall asleep. I tend to turn my FCPX workstation so it never sleeps, even if the screen blanks out. Yes, this uses more electricity. If you are concerned, you can set it back to sleep when you are done. Never use your laptop unplugged to import footage into FCPX. All that number crunching its doing takes up power at a higher than normal rate!
No comments:
Post a Comment