This tutorial will show you how assemble the files you recorded with the BMPCC and Zoom H5/H6 and imported into Final Cut Pro X into one useful synchronized recording of an interview.
The Benefits of "Dual System" recording:
If you have been reading these tutorials, you know that we are recording our interviews using the technique of "dual system." This means that we record audio independently of the audio tracks being recorded by the camera. There are many instances where the audio that is part of the video footage will be adequate to your needs, but you are sacrificing control over your audio signal, and there might be a time when you wish you could independently adjust the sound coming in from a specific microphone. Recording using the dual system technique enables you to do this, plus all of the other benefits that I listed in my "Recording audio in the field" post.
The fact of the matter is that even if you are recording with very top-end filming gear that has XLR on-board audio inputs, (most professional cameras have only two XLR jacks) there are benefits to carrying a recorder like the Zoom H6 out into the field and using it to capture your audio. The wisdom of dual system becomes only more true the higher you climb the cinematic food chain. This is why sound recording is a separate area of specialty on a Hollywood style production. The humble H6 gives you a lot of this flexibility on a budget.
It was a lot more difficult to synchronize audio and video files in the good old days of, say, 2011. Luckily for us, the DSLR revolution put enough pressure on Apple to integrate this feature right into the basic software without the need to buy a plugin.
Selecting your files for synchronization:
The first thing that you are going to have to do is browse through your event and find the video and audio files used in your interview. In this case, I want to select all the files pertaining to Olivia's interview of Joshua.
 |
| Notice that I have selected a video file in the Event "practice interviews." It is displayed in the adjacent window. |
You will want to scroll down the event pane and select all of the video and audio clips that have to do with the interview. NOTE: this is one of those instances where it pays to start and stop/pause the audio before starting the camera and after stopping the camera. FCPX will much more easily be able to synchronize your clips that way, especially if you pause the audio instead of stop it for a new file.
NOTE ALSO: Renaming your interview files with a similar name for the same interview will place them next to each other in alphabetical order. It's a simple thing that makes your life easier.
 |
| You will notice here that I have the one video and two audio tracks highlighted. I've edited their names to be descriptive of not only what they contain, but which microphone is being used. This is useful in the synchronization and editing process. Because they all start with "Joshua," they are all in order, making it easier to select all of the files to synchronize. |
 |
| The dialogue for synchronization. Notice the check box for "Use audio for synchronization." Make sure this is checked! |
When you hit OK, it will take the computer a little bit of time to synchronize things up. If you ever used the Pluraleyes plugin in FCP7, however, you will find that this feature in FCPX is much faster.
When it is done, a new clip named whatever you called your synchronized clip will appear in your event pane. Select this clip and go to CLIP -> SHOW IN TIMELINE. You will get something like this below:
 |
| The synched clip shown in the timeline. Notice the one blue video/audio track and two green audio tracks - each labeled with their file name. Aren't you glad that you went ahead and identified which was each microphone now? |
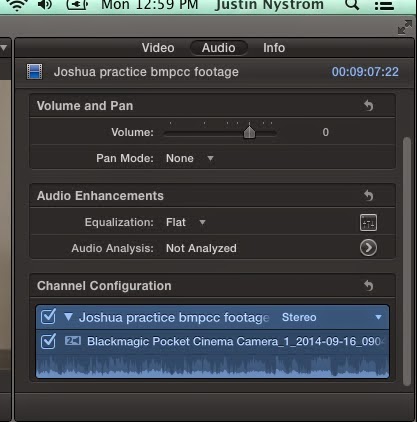 |
| A lot happens in the inspector window. Note the "Video," "Audio," and "Info" tabs at the top. |
When you click on the camera clip in the timeline, information about it will appear in the inspector window. Notice at the top that you have the option of displaying Video, Audio, or Info about the clip. For what we want to do here, click on "Audio." Notice at the bottom of the inspector we see the "Channel Configuration" for the audio tracks. As we imported them, it took the audio and turned it into a two-channel stereo track. To turn the audio off completely, simply uncheck these audio clips in the inspector, and they will no longer be highlighted. When you do this, the waveform of the audio in the timeline will also disappear. If you wanted to keep this audio, you could select it to be mono, reverse stereo, louder, equalize it, etc, etc. We'll consider this stuff more on on our individual tracks from the Zoom.
At this point, you have created a synchronized clip that utilizes the independent tracks recorded on your Zoom. If this is all you wanted to do, however, there would have been no point in recording dual system because you have not yet gotten anything out of the exercise than what you would have otherwise with the audio recorded by the camera. Synchronizing your audio, however, has put you in a position to exert more control over how your finished recording sounds.
Cleaning up your audio:
With the audio from the camera turned off, we can move our attention to the individual audio tracks from the Zoom. Editing audio is complicated, and I am not going to go into a lot of detail on how to improve the quality here in this tutorial. Know that the best thing you can do for your audio is to reduce problems in your environment before you record it in the first place. I know, I know, that is all fine and well, "but how do I take out that leaf blower howling in the background?" you ask. I am no audio engineer, so you are probably going to have to embrace the leaf blower as part of your ambient noise. But you can clean up your audio. Here are a few things to consider:
 |
| At this point, I'm editing the audio on Josh's microphone - the Rode NTG2 Shotgun mic. That track is selected and shown in the inspector. |
 |
| The Audio inspector while looking at the Rode NTG2 microphone. |
In the inspector, you will notice that the microphone is set to "Mono." When you add multitrack audio in a synchronized clip, FCPX automatically puts the clip into the "surround sound" mode. By selecting mono, the audio is replicated equally on both left and right channels. This is what you generally want for interview audio. But if you really want to play with effects, you can listen and see how it sounds coming out of the right, left, center, etc. But for an interview, stick with "mono."
Notice where it says "Audio Enhancements" in the inspector, and below, "Equalization" and "Audio Analysis." Under "Equalization," I find that "Hum Reduction" does the most good in cleaning up any background hiss to the audio. It's an easy fix, but not perfect by any means. This is not to be confused with "Hum Reduction" described below.
To the right of "Audio Analysis" is an arrow facing right. Clicking on that arrow brings up a menu where you can attempt to reduce background noise... which is almost always a losing battle.
 |
| Any more than 10% of background noise removal on a voice recording and the audio you want begins to sound like it originated from a robot. |
"Hum Removal" is something you probably aren't going to use. It is for eliminating electrical hums picked up from electrical current, a very specific wavelength. Don't confuse it with the equalization setting in the main audio inspector window.
"Loudness" is not the same thing as volume. Here is a relatively straightforward description of the difference. If this article doesn't make sense, don't worry about it now. We'll talk more about fine tuning later. The short of it is that "loudness" raises the valleys of your sound and makes them fuller without blowing out the peaks. I haven't found a lot of need to apply this on all but the weakest of audio signals, but as I said, I am no sound engineer... I am a historian!
Another thing you can do in your synchronized clip is go ahead and edit the volume level of your audio tracks. You can do this several ways. You can increase the relative volume by using the volume slider in the inspector window. Another way is to grab the audio level line in your clip on the timeline and move it up and down. This second way allows you to look at the waveforms as you move the volume up and down. Make sure your volume does not peak with red waveform tips. This means that you have set your audio too loud and it will spike.
No comments:
Post a Comment