Monday, November 17, 2014

Sorting out your footage

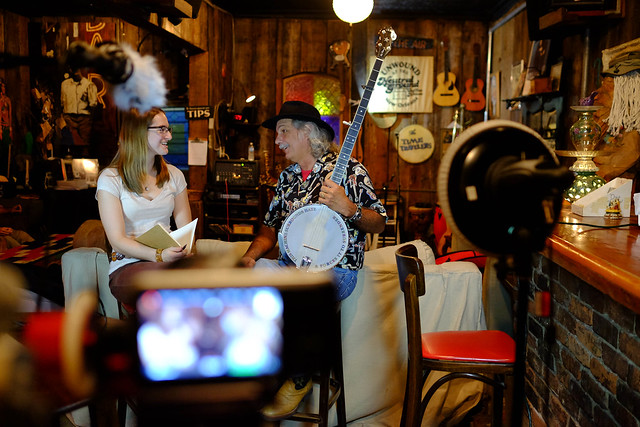
By now, all of the teams have recorded a multi-cam interview using the Sony FS100 and the Panasonic GH3, with audio recorded on the Zoom. All teams should have finished copying these files to their hard drives.

Now it is time to sort all of this data out into something usable.

1) The first thing that you need to do is import all of it into Final Cut Pro X. Create a new Library on your portable hard drive to contain all of your files, which will be imported into an "event" in that library.

The files you have will vary:

One long file of the entire interview from the FS100 - the "A" Camera.
A series of shorter files in series from the GH3 - the "B" Camera.
Three files from the Zoom: Tracks 1 and 2, which are the shotgun microphone, and Track "34" which will be the lapel microphone of the interviewer.

2) One thing that is going to make your life easier in the long run will be to go and take all of the GH3 files and turn them into one long interview file like you have for the FS100. To do this:


  • Create a new project within your new library called something like "John Doe GH3 full interview" or similar. 
  • Select all of the GH3 files and click on the "append files to the storyline" button, or simply hit "E" to add them to the storyline. They should be added in the right order because they will be in your list of files that way automatically because of the sequential file naming. 
  • Once all of the files are in the timeline, you are going to make an exported master file of all of the GH3 files into one big clip. To do this, select File -> Share -> Master File (or Command-E)
  • Make sure you use Apple ProRes422. It will probably be the default setting anyhow, but click on the "Settings" tab to make sure. 
  • Save the file to your portable hard drive some place where you can find it.
  • Import this exported file into your library and use it instead of the individual GH3 files. It will make synchronization work A LOT easier. 

2) The second goal will be to export a file that you can use to transcribe your interview. You will want it to have the entire interview and you will want it to include all of your audio tracks, but only one of your camera angles (either the "A" camera or "B" Camera.)

To accomplish this, you need to synchronize the audio from the Zoom with the files from one of the camera angles. You have done this already, and I have detailed it here.

If the synchronization worked properly, you will want to make a new "Project" within your library. Call it "interviewname transcription file" where "interviewname" is the name of your interviewee. Once this new project has been made, drop the synchronized clip onto the timeline. Be sure to adjust the audio by shutting off the audio from whichever camera angle you used and only using the audio from the Zoom.

With everything synchronized and properly on the timeline, you are ready to "share" the file again. This time, however, you will use File -> Share -> Master File and change the settings to "H.264" instead of Apple ProRes422. This creates a much smaller .mov format Quicktime file that can be used efficiently with our InqScribe software.

3) The third thing that you are going to do is to create a MultiCam clip using the FS100 clip, the full GH3 clip, and the two shotgun microphone tracks. The MultiCam clip you generate is going to be what you use to edit into your film, so you aren't going to need or want the lavalier because you probably have figured out by now that the lapel microphone worn by the interviewer adds a lot of unwanted noise to the recording.) There might not be much difference between the two shotgun microphones, but the idea of hooking two of them up is to have them at slightly different recording levels in case the audio spikes or gets too low, allowing you to switch between them as necessary.

We'll talk more about editing with a MultiCam clip later, but for now, let's talk about creating that MultiCam clip:

Select the FS100, GH3, TR1, and TR2 files from your interview.
Go to File -> New -> Multicam Clip.
Make sure audio is being used to synchronize the clips.
Create the MultiCam clip.

If we get this far this week, we're doing good.

Monday, September 29, 2014

Color Grading your BMPCC footage

If you use the Blackmagic Pocket Cinema Camera to film your interview, you should be aware that you are committing yourself to an extra step in the filmmaking process. That step is called "color correction." This is because the footage from the BMPCC comes out "flat" looking - on purpose. It has been designed to be adjusted to your tastes afterward in the computer. This probably sounds very intimidating, and if you were to use some of the methods employed by professional film studios, it would be far beyond the skill set of both you and your instructor. Happily, the Documentary and Oral History Studio has purchased a copy of a program called "FilmConvert," which makes the color correction process much easier.


A BMPCC still frame before color correction with FilmConvert
After the application of color correction
In reality, having the color correction process built into what we call your "workflow" isn't a bad thing for students to experience. Color correcting will allow you to enhance the way your footage looks before you even begin to edit your film and it offers you an opportunity to correct any problems with exposure and color. It also gives you an enormous amount of control over the look of your film.

FilmConvert is a comparatively simple program to use, and if you are accustomed to adjusting the look of digital photos in something as simple as a social media style image filter like Instagram, you are already familiar with the concept if not the particulars. (Caveat - if you really know color science, you will be able to get even more out of the software. But luckily, FilmConvert may also be used more simply.)

The footage on the BMPCC is flat looking because it contains a bunch of image data that you will need to either enhance or subdue during the color correction process. One way we measure a digital sensor's quality is by its dynamic range, meaning it records more information. Likewise, the video codec - or format of recording the file - is important because the better codecs will be less "lossy" - in other words, they preserve as much of the sensor's dynamic range as possible when recording. Most cameras compress the signal in some way for the sake of data size and write speed, but the problem with compression is that you usually lose some of this dynamic range from the image taken by the camera. The BMPCC preserves a lot of the original image data using the ProRes422(HQ) setting - it's the payoff for the giant files and one of the main reasons people use this sometimes quirky camera. The BMPCC preserves even more when recording in RAW, but for the sake of practicality we aren't using this setting. Perhaps at some point in the future I will write a tutorial on how to use RAW, but it requires an exponential increase in computer processing power and hard drive / SD card storage space. In other words, we don't have the infrastructure, and it would be overkill for your current use in any event.

If you have imported your BMPCC footage from the SD card to a folder on your Buffalo Drive, then you are ready to start working with FilmConvert.

Since you are going to be using the Studio's iMac to run FilmConvert, look for the FilmConvert logo in the computer's toolbar at the bottom of the screen. The logo looks like this:

Use Film Convert 64bit

The program works in three basic steps: 1) Selecting your clips to color correct 2) apply your color correction settings and 3) rendering.

Step 1: Selecting your clips.

Step 1: Choosing the clips you want to color correct
You will notice in the above window that FilmConvert presents you with three main panels. On the left is a straightforward browser pane that allows you to find the folder into which you imported your SD card data. Go ahead and find the files you recorded. Clicking on a file places a thumbnail of that file in the center window with some additional recording information such as length, etc. To select the files that you want to color correct, drag these files from the center pane over to the right hand pane called "SHOT LIST."

When everything you want to color correct is in the right hand panel, click on TAB 2 "Film Settings" at the top.

A tour around the "Film Settings" window - Step 2
Step 2: Color Correcting your Footage

You will notice that you have a lot of different settings to choose from in this pane. This is where your artistry will take place. By the numbers:

1) This is your shot list. You can select one clip or work on multiple clips simultaneously. The clips being used will have the small black box with a white asterisk in the corner. Tip: Only correct multiple clips at the same time if they are multiple shots of the same interview. I.e, the same exact scene and subject.

2) Scrub through your scene to find a representative frame to base your color correction choices upon.

3) Very important! Make sure FilmConvert has the proper camera preset selected. Here it is set for a Canon 1D. Select the Black Magic Pocket, and make sure emulation is set to "Film," which is what we are recording with. This will all of a sudden make a giant difference in the way your file looks because FilmConvert has a bunch of color science built in behind the scenes to make a particular camera's footage look like a particular type of film stock.

4) Exposure and Temperature settings. As a novice color grader, you are much more likely to use the exposure slider than the color temperature slider. Exposure is just that. If your shot is too dark or too light, you can adjust the whole thing here. But there are other places you can adjust just parts of your exposure. See below in "8."

5) Film Presets. This is one of the coolest features of FilmConvert. Here you can select the type of film stock that you want your footage to emulate. Try them out and see what you like. See what looks most natural to you.

6) Within the Film Presets there are some "global" adjustments you can make to color and curve. Plus you need to set the target film frame size. If you aren't sure what to do here, use Super35.

7) Film Grain setting. As far as grain is concerned, I find the standard 100 to be too much. I usually reduce grain to about 20 to 35. To me this seems enough to take that "videocamera" look away without getting too grainy.

8) Three-way color correction. Be careful, but these are powerful tools if used right. The dot in the center of the color wheel adjusts color balance in the shadows, midtones, and highlights. You can also use this to adjust exposure in those three zones.

Notice how selecting the right camera immediately changes the color correction of the footage to look more appropriate.
Notice in the lower left hand corner of the screen you will find presets. You can use your own or use some examples provided by FilmConvert. I have not found any of these presets provided by FilmConvert to be useful. BUT, you will probably want to create YOUR own preset once you have adjusted the image the way that you like it. Notice at the top of the adjustment panel on the right is a button that says "SAVE AS PRESET." It's that easy. To use that preset, just call up the next clip and double-click on the preset. You might not use the preset as-is, but instead use it as a basis point for making fine-tune adjustments but otherwise giving your footage an overall uniform look.

Here I've made some minor adjustments and saved my settings as a preset.
If you look at the corrections pane, I've gone and kept the film stock emulation at Kodak 5207 Vis3, changed the size to Super35 and dropped the grain to 30. In the 3-way color corrector I made the midtones and highlights a little more "blue," which cools off the color. Notice at the bottom the exposure sliders on shadows, midtones, and highlights: I've reduced the exposure on shadows and raised it on the highlights. This gives the image slightly more contrast, which is a look that I prefer. Again, to a degree this is a subjective process.

Step 3: Rendering

The Render screen
Rendering your files creates new versions of your video clips with the color settings adjusted the way you want them. I advise keeping your originals as I am not 100% sure Filmconvert "bakes" in your adjustments. But these converted files are the ones you will import into Final Cut Pro X.

Be sure to save them in a unique folder that you can find when it comes time to import into FCPX. Also, make sure to have the format set to "Quicktime - Apple ProRes 422 (HQ) to ensure no loss of quality.

NOTE: Rendering takes a lot of processor power. Don't interrupt the computer with needless web surfing and the like when it is rendering your files. Also, keep the computer from going asleep. I find that the ETA prediction is pretty accurate.

ALTERNATIVE PROCESS:

There is a FilmConvert Plugin for FCPX, and it is on the Studio's iMac. The only problem is that it isn't on anyone else's computer. This means that your color correction might not work on another computer if you apply it within FCPX. I'm still testing the compatibility of the plugin across campus. Stay tuned.

Monday, September 22, 2014

Synchronizing your audio and video clips from your interview in FCPX - BMPCC Version

This tutorial will show you how assemble the files you recorded with the BMPCC and Zoom H5/H6 and imported into Final Cut Pro X into one useful synchronized recording of an interview. 

The Benefits of "Dual System" recording:

If you have been reading these tutorials, you know that we are recording our interviews using the technique of "dual system." This means that we record audio independently of the audio tracks being recorded by the camera. There are many instances where the audio that is part of the video footage will be adequate to your needs, but you are sacrificing control over your audio signal, and there might be a time when you wish you could independently adjust the sound coming in from a specific microphone. Recording using the dual system technique enables you to do this, plus all of the other benefits that I listed in my "Recording audio in the field" post.

The fact of the matter is that even if  you are recording with very top-end filming gear that has XLR on-board audio inputs, (most professional cameras have only two XLR jacks) there are benefits to carrying a recorder like the Zoom H6 out into the field and using it to capture your audio. The wisdom of dual system becomes only more true the higher you climb the cinematic food chain. This is why sound recording is a separate area of specialty on a Hollywood style production. The humble H6 gives you a lot of this flexibility on a budget.

It was a lot more difficult to synchronize audio and video files in the good old days of, say, 2011. Luckily for us, the DSLR revolution put enough pressure on Apple to integrate this feature right into the basic software without the need to buy a plugin.

Selecting your files for synchronization:

The first thing that you are going to have to do is browse through your event and find the video and audio files used in your interview. In this case, I want to select all the files pertaining to Olivia's interview of Joshua.

Notice that I have selected a video file in the Event "practice interviews." It is displayed in the adjacent window.
After you import your files, but before your synchronize them, it might be worth your while to rename each of the files into something more descriptive, like "Joshua Take One" instead of "Blackmagic Pocket Cinema Camera..." or "Joshua Rode NTG2" instead of "ZOOM0003_Tr1." You rename files in FCPX just like you would anywhere else on a Mac or PC, by clicking on the name, highlighting it and clicking again, allowing you to edit the name. Final Cut will keep track of these changes throughout your libraries. Trust me, this is a nice feature!

You will want to scroll down the event pane and select all of the video and audio clips that have to do with the interview. NOTE: this is one of those instances where it pays to start and stop/pause the audio before starting the camera and after stopping the camera. FCPX will much more easily be able to synchronize your clips that way, especially if you pause the audio instead of stop it for a new file.

NOTE ALSO: Renaming your interview files with a similar name for the same interview will place them next to each other in alphabetical order. It's a simple thing that makes your life easier.

You will notice here that I have the one video and two audio tracks highlighted. I've edited their names to be descriptive of not only what they contain, but which microphone is being used. This is useful in the synchronization and editing process. Because they all start with "Joshua," they are all in order, making it easier to select all of the files to synchronize.
Once you have selected all of the video and audio files that relate to your interview, you are ready to let FCPX create a synchronized clip. To do this, right-click on your selected clips and select "Synchronize clips." The following dialogue box will come up:

The dialogue for synchronization. Notice the check box for "Use audio for synchronization." Make sure this is checked!
The way that FCPX is going to synchronize the tracks is that it is going to listen to the audio tracks on the video and match up its audio waveform with the two independent audio tracks. Thus, make sure the box for "Use audio for synchronization" has been checked. There are other ways to synchronize audio and video, but we aren't going to be using them. On a Hollywood set, all equipment uses a timecode stamp that helps everything stay in alignment, with a timecode signal sent out from a digital slate. We're not quite at that level!

When you hit OK, it will take the computer a little bit of time to synchronize things up. If you ever used the Pluraleyes plugin in FCP7, however, you will find that this feature in FCPX is much faster.

When it is done, a new clip named whatever you called your synchronized clip will appear in your event pane. Select this clip and go to CLIP -> SHOW IN TIMELINE. You will get something like this below:

The synched clip shown in the timeline. Notice the one blue video/audio track and two green audio tracks - each labeled with their file name. Aren't you glad that you went ahead and identified which was each microphone now?
With your synched clip in the timeline, you can scrub through it or play it by start/stopping it with the spacebar. If you are going to use your independent tracks, however, you are going to want to shut the audio off on the camera's clip. This is easy. Select the blue camera clip and take a look at what FCPX calls the "inspector" window in the upper right-hand corner of the FCPX screen.

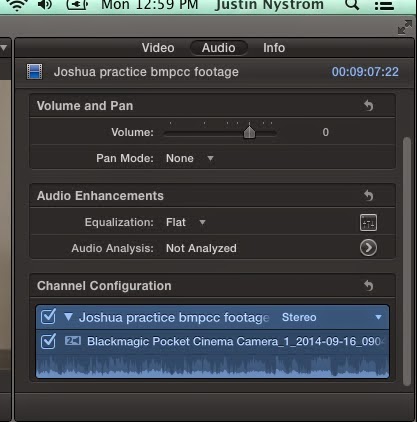
A lot happens in the inspector window. Note the "Video," "Audio," and "Info" tabs at the top.
You will probably spend as much time fooling with settings in the inspector window as you will ever spend cutting your footage for your film, so it is worthwhile to get familiar with it. There is much we will not cover in this particular tutorial, but it is a start.

When you click on the camera clip in the timeline, information about it will appear in the inspector window. Notice at the top that you have the option of displaying Video, Audio, or Info about the clip. For what we want to do here, click on "Audio." Notice at the bottom of the inspector we see the "Channel Configuration" for the audio tracks. As we imported them, it took the audio and turned it into a two-channel stereo track. To turn the audio off completely, simply uncheck these audio clips in the inspector, and they will no longer be highlighted. When you do this, the waveform of the audio in the timeline will also disappear. If you wanted to keep this audio, you could select it to be mono, reverse stereo, louder, equalize it, etc, etc. We'll consider this stuff more on on our individual tracks from the Zoom.

At this point, you have created a synchronized clip that utilizes the independent tracks recorded on your Zoom. If this is all you wanted to do, however, there would have been no point in recording dual system because you have not yet gotten anything out of the exercise than what you would have otherwise with the audio recorded by the camera. Synchronizing your audio, however, has put you in a position to exert more control over how your finished recording sounds.


Cleaning up your audio:

With the audio from the camera turned off, we can move our attention to the individual audio tracks from the Zoom. Editing audio is complicated, and I am not going to go into a lot of detail on how to improve the quality here in this tutorial. Know that the best thing you can do for your audio is to reduce problems in your environment before you record it in the first place. I know, I know, that is all fine and well, "but how do I take out that leaf blower howling in the background?" you ask. I am no audio engineer, so you are probably going to have to embrace the leaf blower as part of your ambient noise. But you can clean up your audio. Here are a few things to consider:

At this point, I'm editing the audio on Josh's microphone - the Rode NTG2 Shotgun mic. That track is selected and shown in the inspector.
The Audio inspector while looking at the Rode NTG2 microphone.
In the inspector, you will notice that the microphone is set to "Mono." When you add multitrack audio in a synchronized clip, FCPX automatically puts the clip into the "surround sound" mode. By selecting mono, the audio is replicated equally on both left and right channels. This is what you generally want for interview audio. But if you really want to play with effects, you can listen and see how it sounds coming out of the right, left, center, etc. But for an interview, stick with "mono." 

Notice where it says "Audio Enhancements" in the inspector, and below, "Equalization" and "Audio Analysis." Under "Equalization," I find that "Hum Reduction" does the most good in cleaning up any background hiss to the audio. It's an easy fix, but not perfect by any means.  This is not to be confused with "Hum Reduction" described below. 

To the right of "Audio Analysis" is an arrow facing right. Clicking on that arrow brings up a menu where you can attempt to reduce background noise... which is almost always a losing battle. 

Any more than 10% of background noise removal on a voice recording and the audio you want begins to sound like it originated from a robot.
 With the Audio Enhancements showing and the audio playing in the background, you can apply some background noise reduction to your clip. I find that about 10% takes a little bit of the hiss away, but much more than that begins to nibble away at the audio quality of your speaker, making it sound unnatural and increasingly robotic as you take away segments of the audio spectrum from the recording. Note that the checkbox for background noise removal must be filled with blue for this modification to your audio to apply.

"Hum Removal" is something you probably aren't going to use. It is for eliminating electrical hums picked up from electrical current, a very specific wavelength. Don't confuse it with the equalization setting in the main audio inspector window.

"Loudness" is not the same thing as volume. Here is a relatively straightforward description of the difference. If this article doesn't make sense, don't worry about it now. We'll talk more about fine tuning later. The short of it is that "loudness" raises the valleys of your sound and makes them fuller without blowing out the peaks. I haven't found a lot of need to apply this on all but the weakest of audio signals, but as I said, I am no sound engineer... I am a historian!

Another thing you can do in your synchronized clip is go ahead and edit the volume level of your audio tracks. You can do this several ways. You can increase the relative volume by using the volume slider in the inspector window. Another way is to grab the audio level line in your clip on the timeline and move it up and down. This second way allows you to look at the waveforms as you move the volume up and down. Make sure your volume does not peak with red waveform tips. This means that you have set your audio too loud and it will spike.

With your audio synchronized and fine-tuned, you are ready to drop your synchronized clip into a project timeline and export a full interview-length transcript file. 


Sunday, September 21, 2014

Saving your video and audio recordings and importing into FCPX

This tutorial tells you about how our equipment stores the recordings that you make and how you transfer those files to your portable hard drive for use in this class. It also shows you how to import these files into Final Cut Pro X (FCPX).


The Basics of SD Cards


An SD Card identical to the ones we use in the BMPCC. (Image from B&H Photo)
Whether you are using the Blackmagic Pocket Cinema Camera, the Panasonic GH3, or the Zoom H6/H5 audio recorder, you will be recording your interviews and footage to "SD" (stands for "Secure Digital") format memory cards.

SD cards have been around since 1999 and have gotten much larger and more powerful over the years. Initially, a 512mb card was considered large but would be considered ludicrously small today. In September of 2014, Sandisk introduced an extremely fast 512GB card for just a little under $750! SD cards vary in storage capacity (measured in GB) and in read/write speed (measured in Megabytes per second or MB/s) The other less precise measure is "Class - Class 6, 10, etc." I have found measuring SD cards by their advertised class to be less useful. Pay attention to the write speed in particular when selecting an SD card - that is what matters the most.

Many DSLR cameras and camcorders will record video to slower cards, but only at their lower quality/lower frame rate settings - the higher quality options will not be available on the camera's menu. I had a student wonder why the video from his Canon 70D looked like crap. It was because he had a cheap, small, and especially, SLOW SD card in it that did not allow him to access the Canon's higher bitrate recording settings. Remember, size is not everything! A large capacity card that is slow will be just as useless as a small card. Go big (and fast) or go home.

The fastest cards the Studio has go in the Blackmagic Pocket Cinema Camera. This is because the data record rate at the BMPCC's highest quality setting is very high. Thus, we use the Sandisk Extreme Pro cards that record at 90 MB/s. The BMPCC kit is supplied with two of these cards. When recording in ProRes422HQ, they will hold 41 minutes of footage. They hold closer to an hour in regular ProRes422. In Compressed RAW, they hold only about 13 minutes. (We're not going to be using RAW workflows in this class.) These cards are fairly expensive. Be careful with them. These were the fastest SD cards you could buy a year ago. Not so anymore.

I have supplied the GH3 with the Sandisk Pro (not "extreme") cards at 45 MB/s. One 64GB card is capable of recording at the camera's highest quality for almost exactly two hours, which is very impressive and practical.

The Zoom audio recorders can get by with much slower cards and a comparatively small and slow card will record hours upon hours of multi-track audio.

Copying Your Data to the Hard Drive


The first thing you should do after filming an interview is copy the contents of  your SD cards to your portable hard drive:

Since Final Cut Pro X (FCPX) is designed around using a fast external hard drive, I will issue each of you a 1TB (one TerraByte, or 1000GB) Thunderbolt based hard drive, the Buffalo MiniStation. The point of this is that it will allow you to carry your drive to any of the labs on campus that use FCPX to work on your project. The Studio has only ONE editing workstation of its own.

If you do not own a newer Mac that has the Thunderbolt port, the Buffalo drives are capable of also running off of a special USB cable. While USB is not a viable option when running FCPX - it is much too slow - you may need to use it to save the data from your SD card to the drive if you cannot immediately get to a computer with FCPX on it and need to return the equipment. The Buffalo drive can also be read by a PC, but I have not tried this to confirm. Yet I believe it is possible to even use a Windows based PC to copy your data to the Buffalo drive... I just haven't tested it.

While you can import your footage to the computer by plugging the camera into the computer's USB port with the appropriate cable, this is not the most efficient way of doing it. Most computers now (including all recent Macbooks and iMacs) have SD card readers built in. Thus, the first step to importing your footage is to pop out your SD card and put it into your computer's reader slot and plug in your Buffalo MiniStation Drive.

Copying your files if you don't have immediate access to FCPX:


When I do my work, I tend to import my files directly into Final Cut Pro from the SD Card. But if you aren't near a computer using Final Cut (which is a real possibility) and you want to save the data from the SD card before turning in your equipment, then you should do the following:

Plug the SD card in and copy the card's entire contents to a folder labeled "raw SD card data" or some other memorable name that you created ON YOUR THUNDERBOLT portable drive. This will enable you to import the data properly into FCPX later on.

BUT NOTE... IMPORTANT!!! If you just drag the SD card icon to your folder on the Buffalo Drive, it will only create an alias of the card, not copy the actual data. You will LOSE all your footage if you do this. The way to make sure that is to open the SD card and copy all the files/folders from the card to your Buffalo Drive.

One benefit of copying your files this way is that you will spend less time copying them when you are finally wanting to import them into FCPX because you will be pulling them into FCPX from your Thunderbolt-equipped Buffalo Drive, which is a lot faster than your SD card reader.

Another benefit of copying from your SD cards to a folder on your Buffalo drive is that if you do your importing into FCPX directly, you have to wait until FCPX is all done with a card (including transcoding) before it will allow you to eject it. FCPX is also sometimes wonky about letting you eject a card that you are clearly done using, saying "it is being used." This requires you to quit FCPX to eject the card and re-start the program to begin importing from another card.

How the files appear when stored on your cards:

Blackmagic Pocket Cinema Camera:
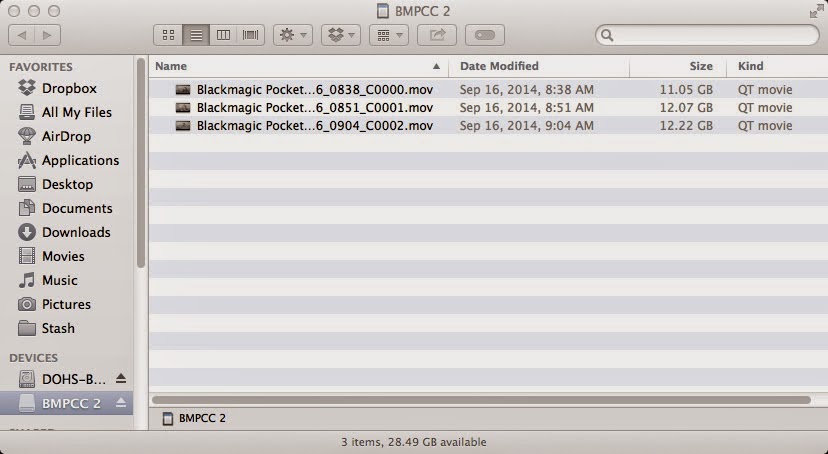
The files on the BMPCC are located in the root directory of the SD card... and they are GIGANTIC!
To copy these to a folder on your hard drive, "Select All" and drag them to the appropriate folder. Be prepared to wait. The BMPCC files are very large. Yet the simplicity of this file structure is one of the beauties of the BMPCC.

Panasonic GH3

The GH3 does things a bit differently than the BMPCC. The system it uses is better than most DSLR cameras that shoot HD video, but it isn't as seamless as the one large file generated by the Blackmagic. This has to do, it seems, with some sort of camcorder tax in Europe. In other words, there is no technological reason for it. What this means is that most DSLR cameras will only record about 30 minutes of video before you have to start and stop - meeting the maximum allowable file size before the Euro camcorder tax applies. This is not acceptable for a long form interview, and the Panasonic line of GH2/3/4 are the only cameras that I know of to date that have implemented the idea of the automatic chaining of files together in sequence. In other words, when the file gets too big, it automatically starts recording another file. Thus, in an interview like the one shown below, which ran a couple of hours, we see 14 files instead of 2, reflecting the number of times the camera was actually started and stopped. You will notice that all of the files are about the same size.
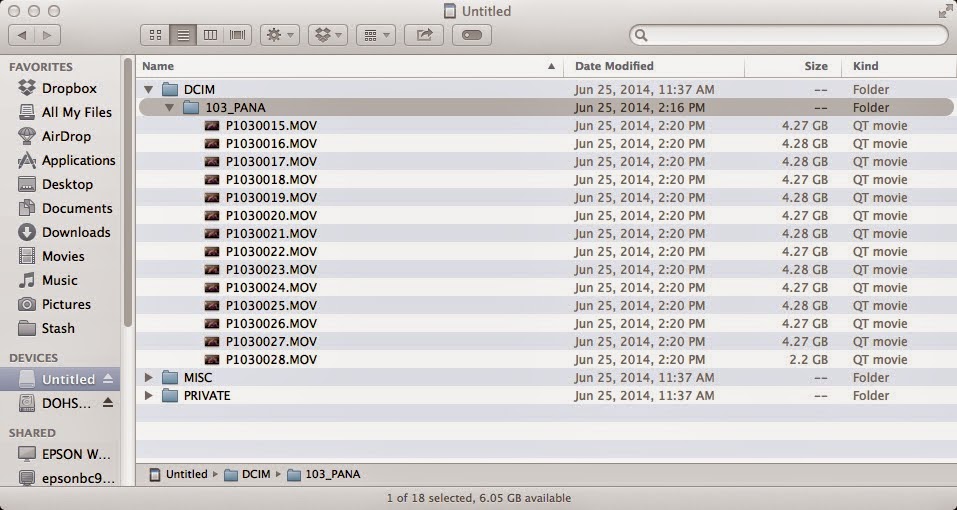
The Panasonic GH3's file structure.

You will find these files located in the DCIM folder in a "_PANA" subfolder. If you go to import these directly into Final Cut X, FCPX will automatically know where to find the files on the SD card.


Zoom H5/H6:

It is important to understand how the Zoom stores the audiorecordings you make. It is actually very simple but will drive you crazy if you aren't aware of how it all works. The Zoom H6 is capable of recording six independent tracks (Left, Right, 1, 2, 3, and 4). The Zoom H5 is capable of recording four independent tracks (Left, Right, 1, and 2.) Left and Right are recorded as a stereo pair in the same track. Since you aren't generally recording L and R (these tracks come off the Zoom's built-in microphone) you won't probably encounter these files. But if you do, they will be called ZOOM000x-St.WAV where "x" is the number of your recording. Each of the other tracks will be named ZOOM000x-Try.WAV where "x" is the recording number and "y" is the track number. See the image of the Zoom's folders below:
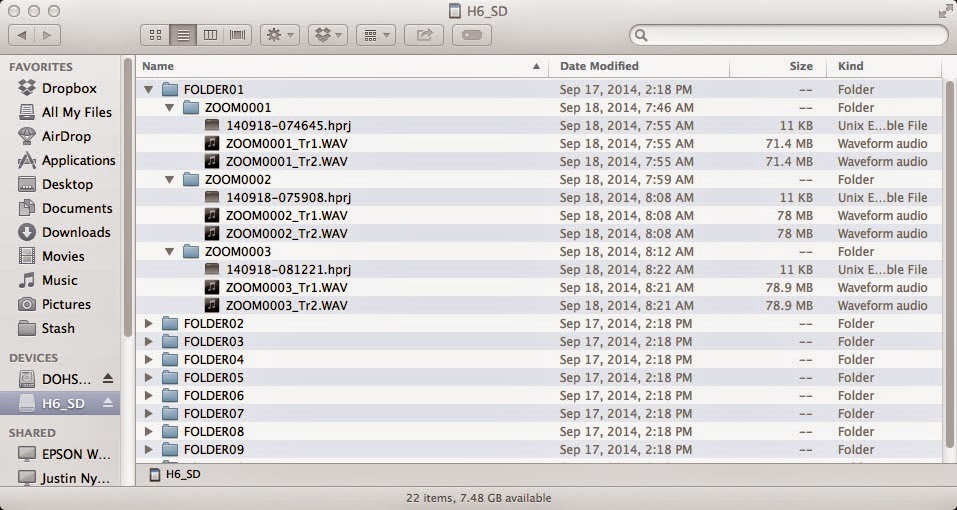
The file structure from the Zoom H6
You see that the Zoom H6 card is formatted with 9 folders. You probably won't be using more than one folder unless you decide to go hunt through the menus on the Zoom and change the one that you are recording to. Chances are, everything you record will be found in "FOLDER01." For each time you press "record" and "stop," the Zoom will create a subfolder in the active folder (FOLDER01) called ZOOM001, ZOOM002, etc. Each of these subfolders contain the tracks that you recorded. In the image above, you can see that the "Start" and "Stop" button was pressed three different times, creating three different subfolders, each containing the Track 1 and Track 2 WAV files plus an instruction file. To copy these files to your hard drive manually, you just need to copy the FOLDER01 to your raw import folder on the Buffalo Drive, and everything in it will copy over as it appears on the SD card.  A tip: Once you have copied "FOLDER01" over to your hard drive, rename the folder something memorable like "Jones interview audio" etc. That way if for some reason you do this exercise again and have not yet imported your recordings into FCPX you do not overwrite your audio files with another "FOLDER01." 


Importing your files into Final Cut Pro X


NOTE: If you are importing files from the BMPCC, you are probably going to want to color correct them first with FilmConvert. See this post on how to do that.

FCPX can be an intimidating program if you have never used any video editing or graphics oriented software before, but it is actually pretty easy to use. It is, however, important to follow directions to make sure your project turns out. There are a gazillion files that go into making an edited sequence - ones you see and a whole bunch more that you do not see - files that are used by the computer to manage its functions. It is important to not lose track of any of these files. Fortunately, FCPX does pretty much all of the file tracking for us. In fact, file management is one of the big advantages that Apple put into FCP in the "X" version over the previous version, "7." (Don't ask me where versions 8 and 9 went!) The latest update to the software changed a few things around in this regard a bit right before our semester began. After a bit of anxiety on my part, I now see that this system is even better for students new to the software and will probably help me manage your files more effectively in the long run.

The first thing you will probably ever do with FCPX is import your footage, and that's all we are going to concentrate on right now. We will deal with only the upper left hand corner of the screen right now. Don't be overwhelmed by all of the other windows. Forget about all that!!
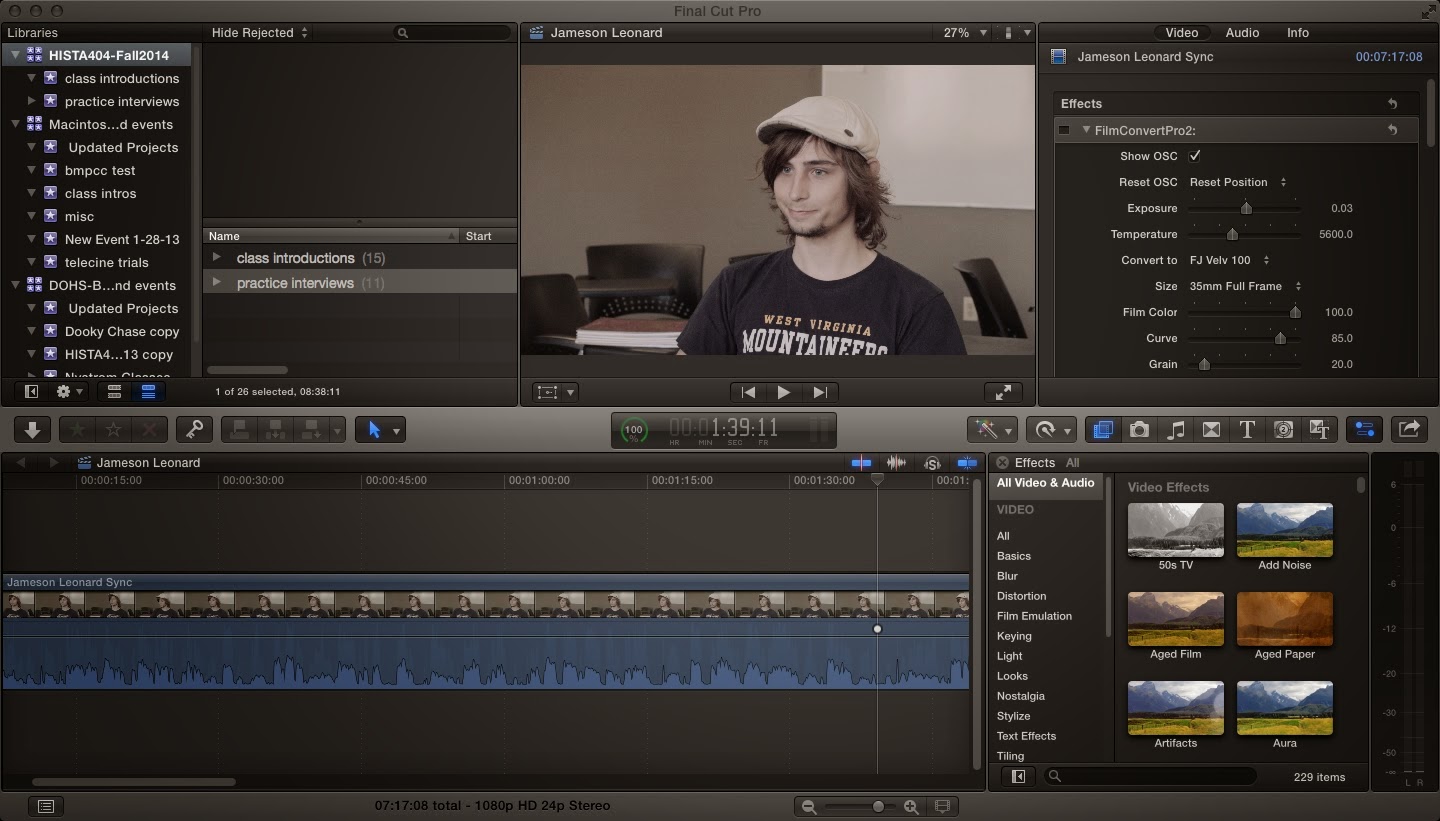
There are a BUNCH of windows in the FCPX screen. Don't worry about that now. All we are going to concern ourselves with at this point is the upper left hand corner, the "Libraries" window.
All the gazillion files you will need to make your movie are stored in units called "Libraries." This is actually a rather complex file structure, but like a lot of Apple software, you would never know it. If you want to learn a little more about Libraries, a fellow by the name of Larry Jordan has written a bunch of great tutorials. But you might not want to look just yet if this is all new to you.

If you are importing files for the first time, or are starting a completely new project, go ahead and create a new library to contain everything that you are going to import by going to FILE -> NEW LIBRARY.
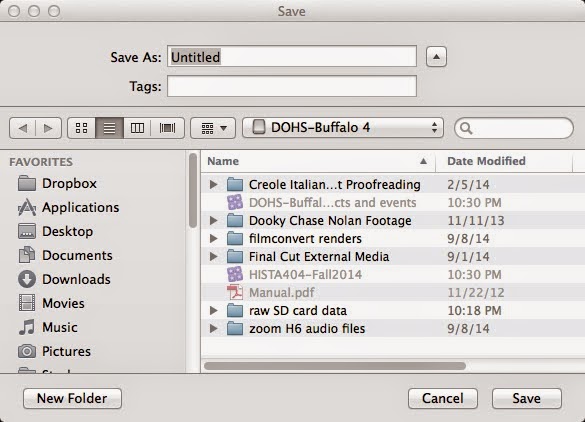
When you hit FILE->NEW LIBRARY it will bring up this dialogue. BE SURE that your Buffalo Drive is the selected volume for your new library (here it is DOHS-Buffalo 4). You can name it whatever you want, but please be descriptive of the Library's content.
My advice to you is to not name your library something like "HISTORY A404." I will be collecting your drives at the end of the semester, and would like some sort of unique name on your files. Perhaps your own name would be a good thing. Or perhaps the name of the person you are interviewing for this class. I thank you in advance. For the sake of this class, you are probably only ever going to need to create one library. In fact, I discourage you strongly from creating more than one library this semester.

Once you have created your library, you are ready to start importing footage into it from either your SD Card or from the folder on your Buffalo Drive where you saved the files from your SD cards. There are a number of ways to tell FCPX to import media, but the one that I like the best is to right-click on your library in the "Libraries" window in the upper left hand corner and it will pop up a menu that offers you a number of options including "Import Media... " or [-I].

When you import media, you are creating an "EVENT." "Events" are where you store the files that you record as well as manipulated versions of those recordings. Libraries can contain many events. If you have used iMovie, events work very similarly. For instance, say you interview two different people, you could put them into two different events in the same library. Or perhaps you want to put all of your B-roll material in one event and your interviews in another. Think about ways that this can help you organize your material. "Projects" are edited sequences that reference the files in your events - something you will learn about later.

Importing Media:
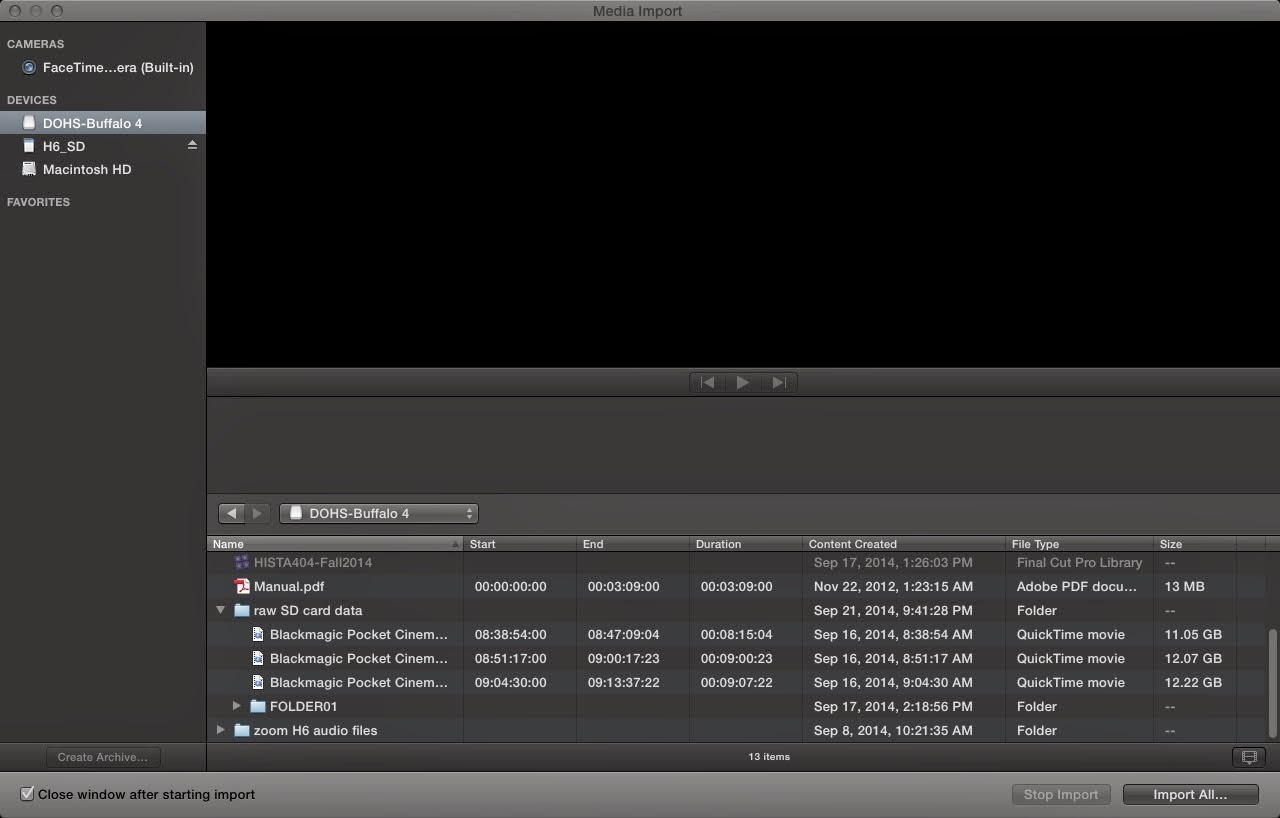
Right-clicking to "Import Media..." or clicking on your library and hitting [COMMAND-I] will bring up the Media Import window
The Media Import window is extremely straightforward. You will notice that all of your devices, or media sources are listed to the left. If you are importing directly from your SD Card, select it and use the file pane to select the media you want to import. Clicking on a file will show a preview of it above.

When you have selected your media, you can hit "Import Selected." This will bring up a dialogue box:
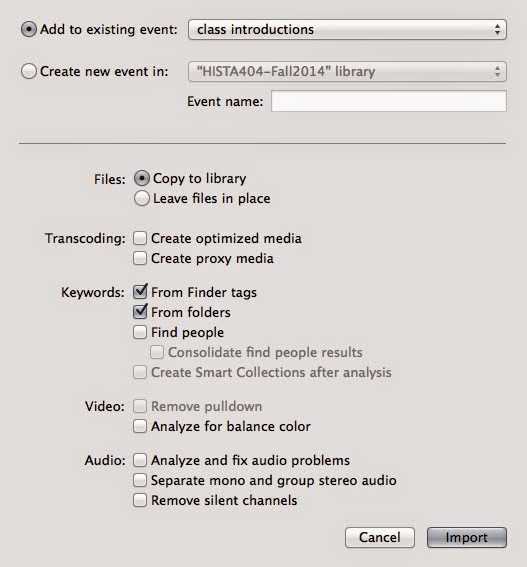
The dialogue box for importing media into an event.
You will see that this dialogue box gives you a lot of options, and you shouldn't just discount them without reading what they say. First, it asks if you want to add to an existing event (if there is one.) In the case above, I am going to add it to an event I already created called "practice interviews" instead of the event "class introductions" by using the drop down selector. (You could import your media to a different library entirely with the next option below by clicking it, or simply create a new event in the library listed by typing a name in to the box.)

Make sure the "Copy to library" button is selected! This will make copies of the files that you already have in your Buffalo Drive's folder and place them in the right spots in your Final Cut library. Technically speaking, this is wasteful of disk space, but to not do this is a REALLY BAD IDEA.  Once the files have been copied to your FCPX library, you won't need the folder where you originally copied the files from your SD card.

Files normally need to be TRANSCODED. This means that the format in which your camera recorded your movies needs to be converted into the video file format (or "codec") used by FCPX, a variety of Quicktime called "ProRes." There are a bunch of different flavors of ProRes, including "lite," standard 422, HQ, 444, etc. These all have to do with the amount of image data stored in them. The files I imported here came from the BMPCC, which records natively in ProRes so they do not require any transcoding. Final Cut knows this automatically so the button is not checked. This is one of the nice things about the BMPCC camera. It takes a lot less time to import the files because no "transcoding" needs to take place. When you import from the GH3, however, the files need to be transcoded from the GH3's native format to the ProRes that FCPX needs. Note: ProRes is a type of Quicktime file. Quicktime is a container that uses the .MOV and .M4V extensions. Don't worry if you don't understand all of this right now.

Generally do not allow FCPX to fix any audio or video problems when it imports your files. If there are problems, we'll take care of that when we edit.

Something to think about with the Zoom: If your event already has ZOOM track files in it, and you are importing new ones recorded at another session, there is a good chance that you will create duplicate file names in your event. FCPX will not overwrite the existing files in your event, but you will have two different tracks with the same name in your event (FCPX will put a marker on the new files). You can rename any of the files in the event to help keep them straight, but you might just consider creating a new event entirely when you import from a different recording session.

NOTE ALSO, if you select the folder on the Zoom instead of just the .WAV files, FCPX will tell you that the instruction files are not supported. That's okay, you don't need them in FCPX. By just checking FOLDER01 in the import dialogue, it will import all of the tracks stored in all of the subfolders.

NO, YOU AREN'T DONE YET!!

It will appear that your files have imported into their event immediately after clicking on "Import." In fact, when you click on your event in the Libraries window,  you will see your recordings displayed and can even play them. But this does not mean that FCPX is done copying the media to the proper location or transcoding it to ProRes. In the very center of the FCPX window you will see a little circle with a "%" in the bottom of it and a number in the center. This is your processing status indicator, and you will come to hate this little number and window with a passion. Click on it and it will bring up the following status window:
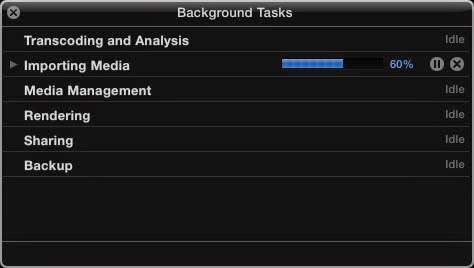
Where your computer's processing power comes to bear.
The "Background Tasks" window is a status indicator of all of the time consuming things that FCPX does. "Transcoding and Analysis" is the aforementioned transcoding process of converting a video file from one format into ProRes. "Importing Media" is... you guessed it. Until it is 100%, you haven't fully imported your footage. "Media Management" is when FCPX needs to shuffle files around. "Rendering." Ah, rendering. We'll talk about this more later, but this is where the computing power of your system comes into play. "Sharing" is generally the status of exporting files. Lastly, "Backup" is the backup of your libraries. I'm still learning about that one myself.

One frustrating thing that you will notice is that any time you use your computer in FCPX, most of these processes pause. If you are in a hurry, don't touch the computer, and don't let it fall asleep. I tend to turn my FCPX workstation so it never sleeps, even if the screen blanks out. Yes, this uses more electricity. If you are concerned, you can set it back to sleep when you are done. Never use your laptop unplugged to import footage into FCPX. All that number crunching its doing takes up power at a higher than normal rate!


Monday, September 8, 2014

IRB and Belfast Project

Doing oral history is most often a pleasant and edifying experience that harms nobody and benefits many. But there are subjects that are very compelling and important being studied by historians, political scientists, and sociologists that touch on difficult and sometimes dangerous topics. The Belfast Project is one such case.

This is one of the reasons why institutions have embraced Institutional Review Board (IRB) regulations for oral history. Twenty years ago, this was almost uniformly not the case. We will look at IRB today, the "dangers" of oral history as perceived by institutions, and why this remains an area of oral history subject to future change.

This is still a hot topic as shown by this July, 2014 Boston Globe piece.

 CNN did an extended piece on it. This website seems to want the tapes out:


And then counter it with this Forbes article: